Journal Settings
The Journal Settings section is designed to facilitate the management of your specific journal. Within this area, you can update journal information, manage site details, configure user roles and permissions, access developer settings, and generate reports for analysis.

Configuration
How to Update Journal Information?
Updating your journal’s information within the Journal Management System (JMS) ensures that your journal remains current with evolving editorial needs, submission guidelines, and publishing policies. This user guide provides detailed instructions on how to access, edit, and save changes to your journal's information using the Journal Settings > Configuration section.
Steps to Modify Journal Information
Navigate to Journal Settings
-
From the JMS dashboard, locate the Journal Settings section.
-
Click on Configuration to open the journal’s detailed settings panel.
Accessing the Journal Configuration Panel
- The Configuration section displays all the existing details of your journal.
Editing Journal Information
Select the Section to Edit:
- Click on the specific section or field you want to modify (e.g., journal title, article type, file type etc).
Make the Necessary Changes:
- Directly update the fields by typing in the new information or adjusting settings through dropdowns or checkboxes.
Saving Changes
- After making your edits, click the Save and update button to ensure that your changes are applied.
Additional Configurable Fields
-
SUBMISSION CHECKLIST
-
REVIEW FORM
Submission Checklist
The Submission Checklist ensures that authors meet all necessary submission requirements before proceeding, helping maintain quality and compliance with journal guidelines. This guide explains how to edit, remove, or create new checklist items for seamless journal submissions.
Editing a Predefined Checklist Item
1. Locate the Item to Edit:
- Browse through the existing checklist and click the Edit option next to the item you want to modify.
2. Make the Necessary Changes:
- Adjust the content or change the display position (the order in which it appears to authors).
3. Save Changes:
- Click Submit to apply the modifications.
Deleting a Checklist Item
1. Identify the Item to Remove:
- In the checklist list, locate the item you want to delete.
2. Delete the Item:
Click the Delete option. A confirmation prompt may appear—confirm the deletion to remove the item permanently.
Creating a New Submission Checklist Item
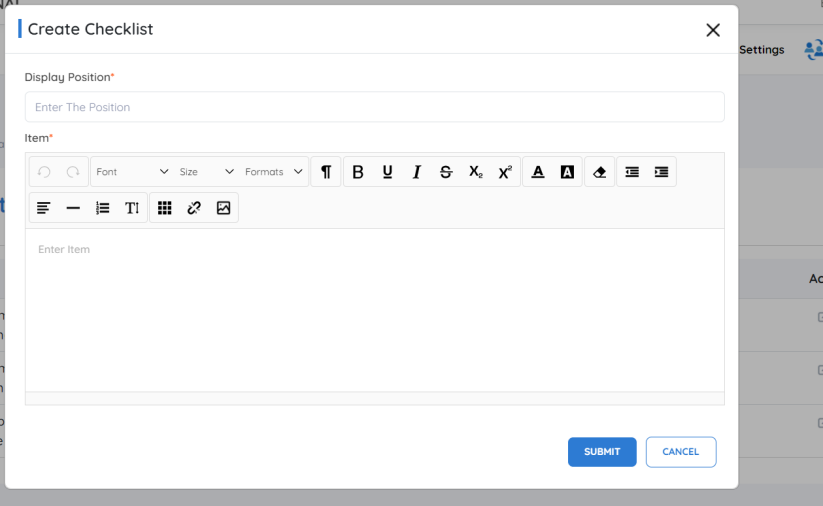
1. Add a New Item:
- Click on the Add Item button.
2. Define Display Position:
I- n the Display Position field, enter the position number to determine where the new item will appear in the checklist. (For example, if you enter “1,” it will be the first item in the list.)
3. Add Content for the Checklist Item:
- In the Item Field, type the content you want authors to review before submission. This could include reminders about formatting, document requirements, ethics policies, or supplementary materials.
4. Finalize the Checklist Item:
- Once you have entered all required information, click submit to save the new item. The item will now appear in the checklist based on the specified display position.

Review form
The Review Form is a critical tool within the Journal Management System (JMS), designed to standardize and streamline the evaluation process for submitted manuscripts. It ensures that reviewers provide structured, consistent, and comprehensive feedback, helping the editorial team make well-informed decisions about publication.
This section explains the importance of the review form, its customization options, and how to configure it for your journal.
What is Review Form?
The Review Form is an essential component of the Journal Management System (JMS), designed to facilitate the evaluation of submitted manuscripts.
This form ensures that reviewers provide comprehensive feedback, enabling the editorial team to make informed decisions regarding publication.
In our JMS, you can customize a set of conditions specific to your journal regarding the Review Form. This configuration will be displayed to the Editor-in-Chief (EIC) when assigning a reviewer.
Configuring the Review Form
When setting up a review form in the JMS, several configuration options are available to ensure that it aligns with your journal’s requirements.
Is it necessary to include a review form with every review request?
You can choose whether the review form must accompany each review request. This configuration ensures the editorial process remains consistent and reviewers follow a structured format.
- YES:
Reviewers must fill out the review form when submitting their evaluations.
- NO:
The review form is optional for the reviewers. They can provide feedback in freeform text or any preferred format.
Reviewer Form Attachments
Click on the "Choose File" option.
Select the appropriate review form or template from your device.

Site Info

How Authors Submit Manuscripts
The Submission URL is a crucial feature of the Journal Management System (JMS), providing authors with direct access to your journal's submission portal. This unique URL can be embedded within your journal's website or shared through various communication channels, allowing authors to easily initiate the manuscript submission process.
Accessing the Author Submission Link
To find the author submission link, navigate to Journal Settings and select Site Info. Here, the author submission link will be displayed.

Edit Site Info Link
If you need to modify the site info link, adjust it according to your journal's guidelines and click Save to apply the changes.
Embedding the Link on Your Website
-
Copy the Link:
-
Once you have saved any edits, copy the submission URL.
-
Embed:
Add the link to your journal’s website or share it through newsletters and announcements to encourage submissions.
Previewing the Submission Interface
-
Click Preview:
-
Use the Preview option to see how the submission interface will appear to authors.
The preview displays all relevant information, including submission guidelines and required fields.
Author Experience
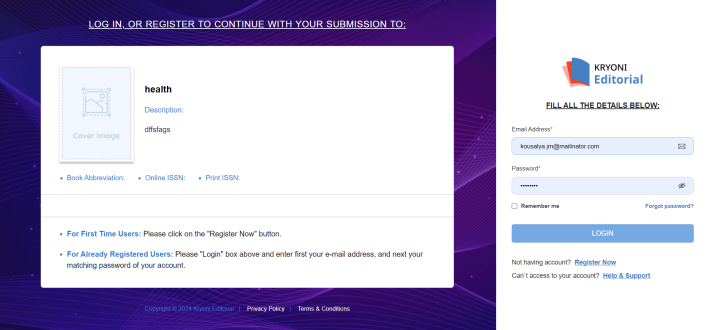
Once authors click on the Submission URL, they will be directed to the submission interface, where they can upload their manuscripts, enter required metadata, and submit supporting documents for review.
User Roles and Settings
How to Add Users to the Journal Management System (JMS)
Managing editorial roles in the Journal Management System (JMS) is streamlined to ensure efficiency in the publishing workflow. Within JMS, you can easily add, assign, or delete users, as well as customize roles based on your journal’s specific needs. Here’s a step-by-step guide on how to add a user to JMS and assign roles effectively
How to Add Users to the JMS
1. Access Journal Settings
-
Go to the Journal Settings section from the main dashboard.
-
Select User Roles and Settings to manage users for the selected journal.
- View Available Roles
JMS offers several predefined roles to cover various editorial needs:
- Editorial User:
Responsible for managing the editorial workflow, including reviewing submissions and making final decisions on publication.
- Reviewer:
Evaluates and provides feedback on submitted manuscripts to aid in the editorial decision-making process.
- Author:
Submits manuscripts and manages submission status and history.
Add User
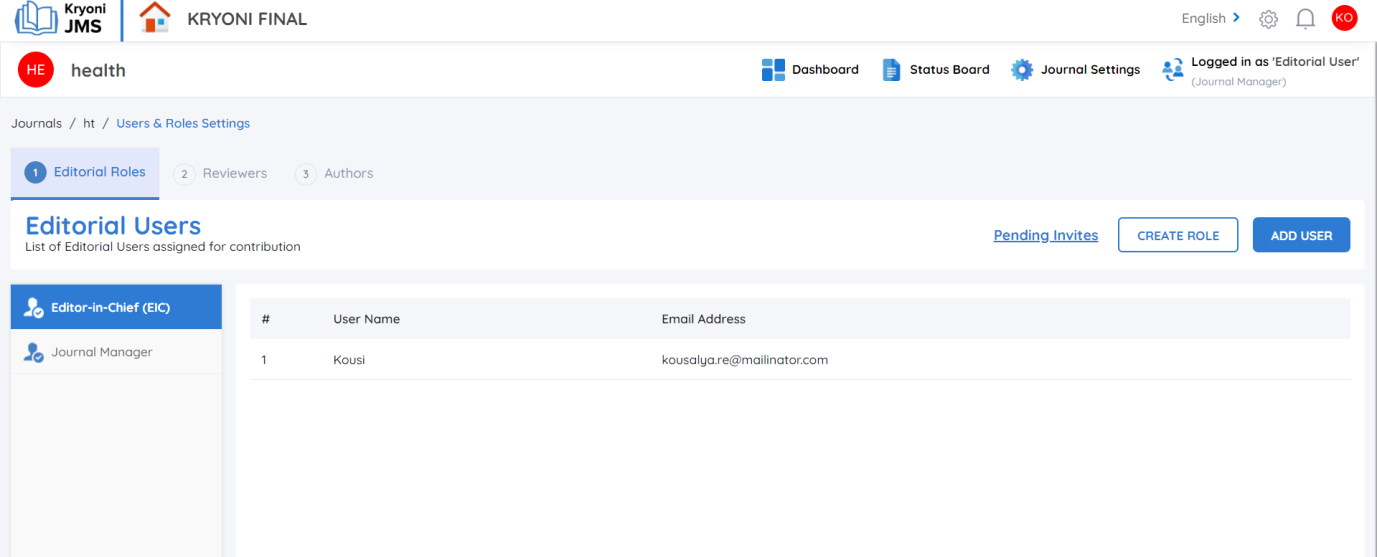
How to Add an Editorial User
-
Click Add User from the User Roles and Settings section.
-
Enter the Email ID of the user you wish to invite.
-
The user will be added to the JMS
INVITE A NEW USER – LINK
How to Add a Reviewer
-
Click Add Reviewer in the User Roles section.
-
Enter the Email ID of the reviewer.
-
Select Reviewer from the role dropdown.
-
The reviewer will be added to the JMS
INVITE A NEW USER – LINK
How to Add an Author
-
Click Add User within the User Roles and Settings section.
-
Enter the Author’s Email ID.
-
Select Author from the dropdown.
-
The author will be added.
INVITE A NEW USER – LINK
- Custom Role Creation:
If predefined roles do not meet specific needs, JMS offers the flexibility to create custom roles, allowing for tailored permissions and responsibilities. This is ideal for specialized workflows and roles unique to your journal.
Create Role
Add User – Predefined Role
-
Click on the Add User button.
-
Select a predefined role from the drop down.
-
You can also assign multiple roles to a single user based on their involvement in the editorial
Create A Custom Role
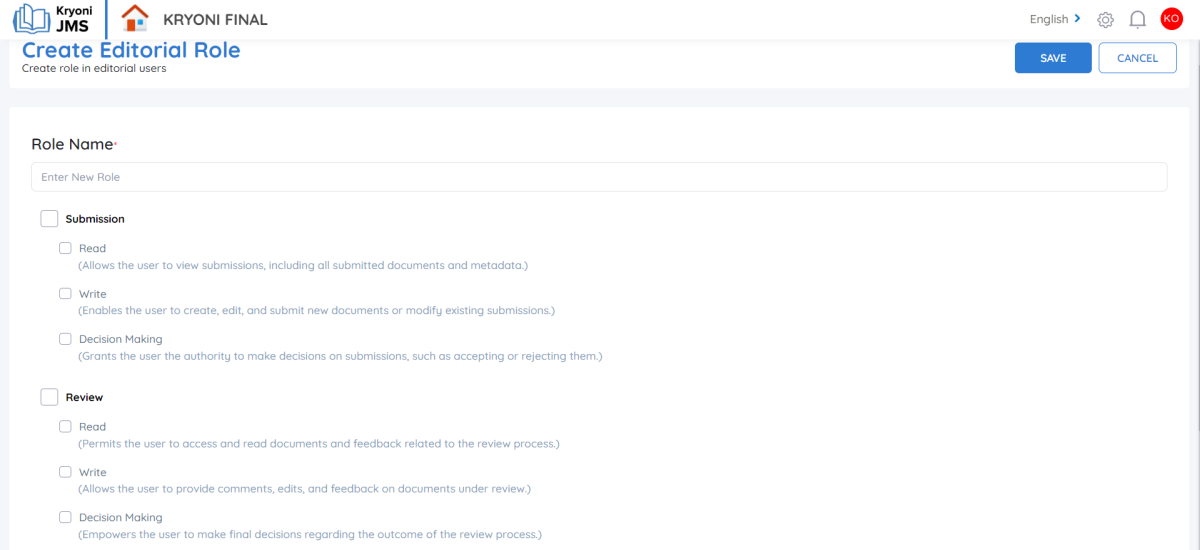
If predefined roles don’t meet your needs, JMS offers a Create New Role option for greater customization
How to Create a Custom Role
- Access the Role Settings
-
Go to Journal Settings and select User Roles and Settings.
-
Click Create New Role to start the customization process.
- Enter a Name for the Role
- Provide a unique name that reflects the responsibilities of the new role (e.g., "Content Coordinator" or "Quality Reviewer").
- Assign Permissions to the Role
- You can customize permissions in the following sections of the journal workflow:
Permissions Categories
Submission: Manage manuscript submissions, view documents, or approve submissions.
Review: Assign reviewers, oversee review feedback, or make review decisions.
Production: Oversee production tasks such as formatting and final proofing.
- Set Permission Levels for Each Section
Each workflow section offers the following permission levels:
-
Read: Grants access to view submissions and documents without making changes.
-
Manage: Allows users to create, edit, and submit new documents.
-
Decision Making: Provides the authority to accept, reject, or request revisions.
- Finalize the Role
- Review the customized permissions and click Create to save the new role.
These customizable permissions allow you to control what access each user has across the journal's workflow.

After Role Creation:
Once the new role is created, you can assign users to it
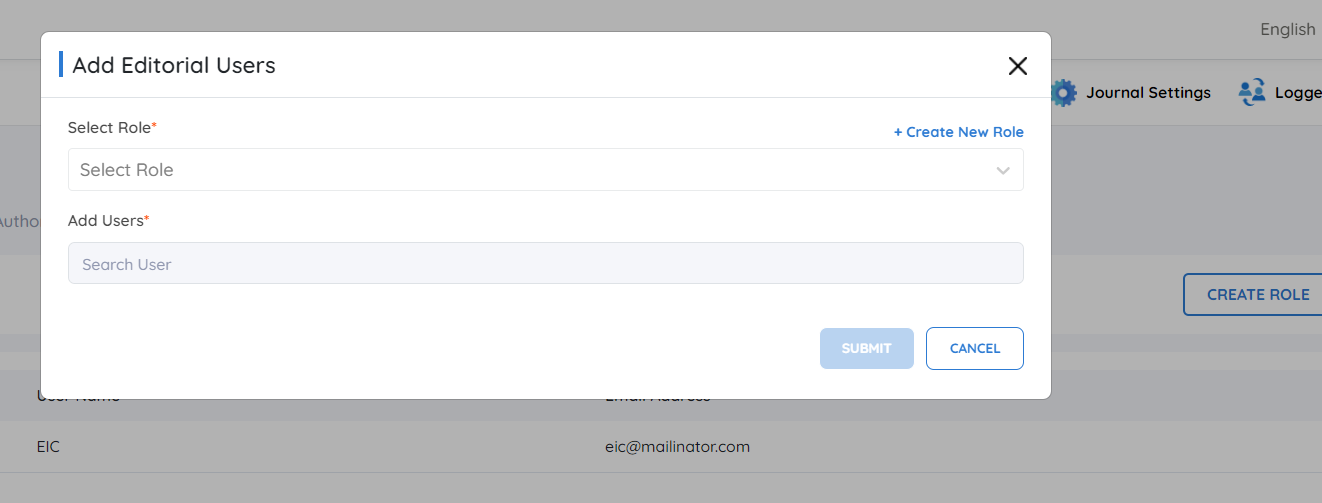
Add a New User
-
Click Add User within the User Roles and Settings section.
-
Enter the User’s email to invite them to the system.
Select the Custom Role
- Choose the newly created role from the dropdown list.
Complete the Process
- Click Submit to add user.
By customizing roles and permissions, you maintain control over the access and functions available to each user, ensuring that the journal's workflow is managed effectively.
Benefits of Custom Role Management
-
Ease of Use: Effortlessly manage user roles in the editorial process.
-
Flexibility: Custom roles allow for tailored workflows suited to your journal’s unique needs.
-
Detailed Permission Control: Define permissions at a detailed level, ensuring users only access the necessary functions.
With these steps, JMS provides a flexible and controlled way to manage users and roles, streamlining the editorial process while maintaining clarity and security.
Inviting a NEW User - LINK
Pending Invites Section
Pending invites: If a user has been invited but has not yet accepted the invitation, the invite will appear in this column. A notification email is sent to the user, and their status remains pending until they complete the registration process.
-
Resend Invite: If needed, you can resend the invitation to users who have not yet accepted. This option allows you to ensure that they receive the necessary information to join.
-
Pending Due Date: The due date for pending actions will be clearly mentioned, providing a timeline for users to accept their invites and complete their registration.
Developer Setting
The Developer Settings section provides comprehensive management of all email templates associated with various actions performed within the Journal Management System (JMS).
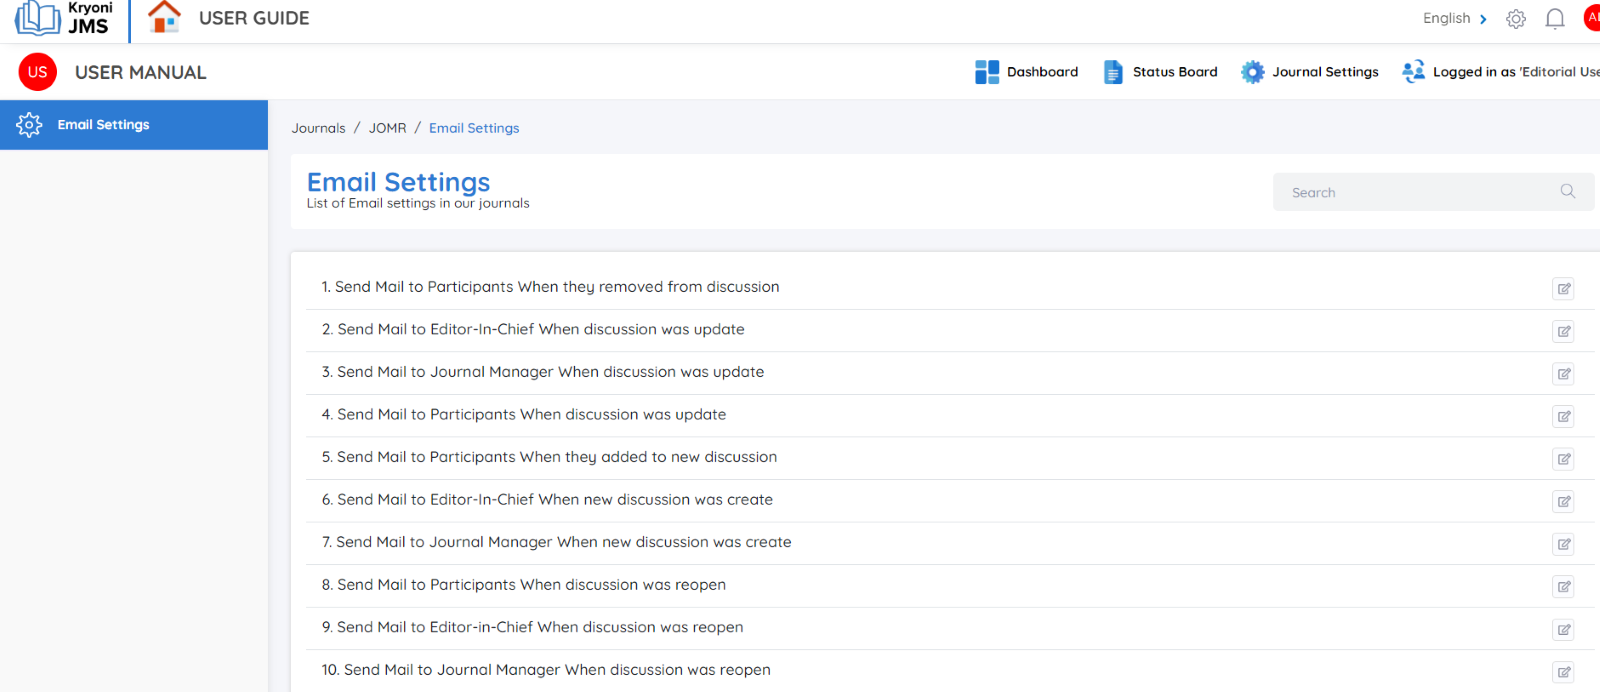
Benefits of Developer Settings
-
Customizable Communication
-
Efficient Email Management
Editing Email Templates
To tailor the email content to your specific needs, click the Edit icon next to the respective template. This allows you to modify the content as required, ensuring the messaging aligns with your publishing house’s communication style.
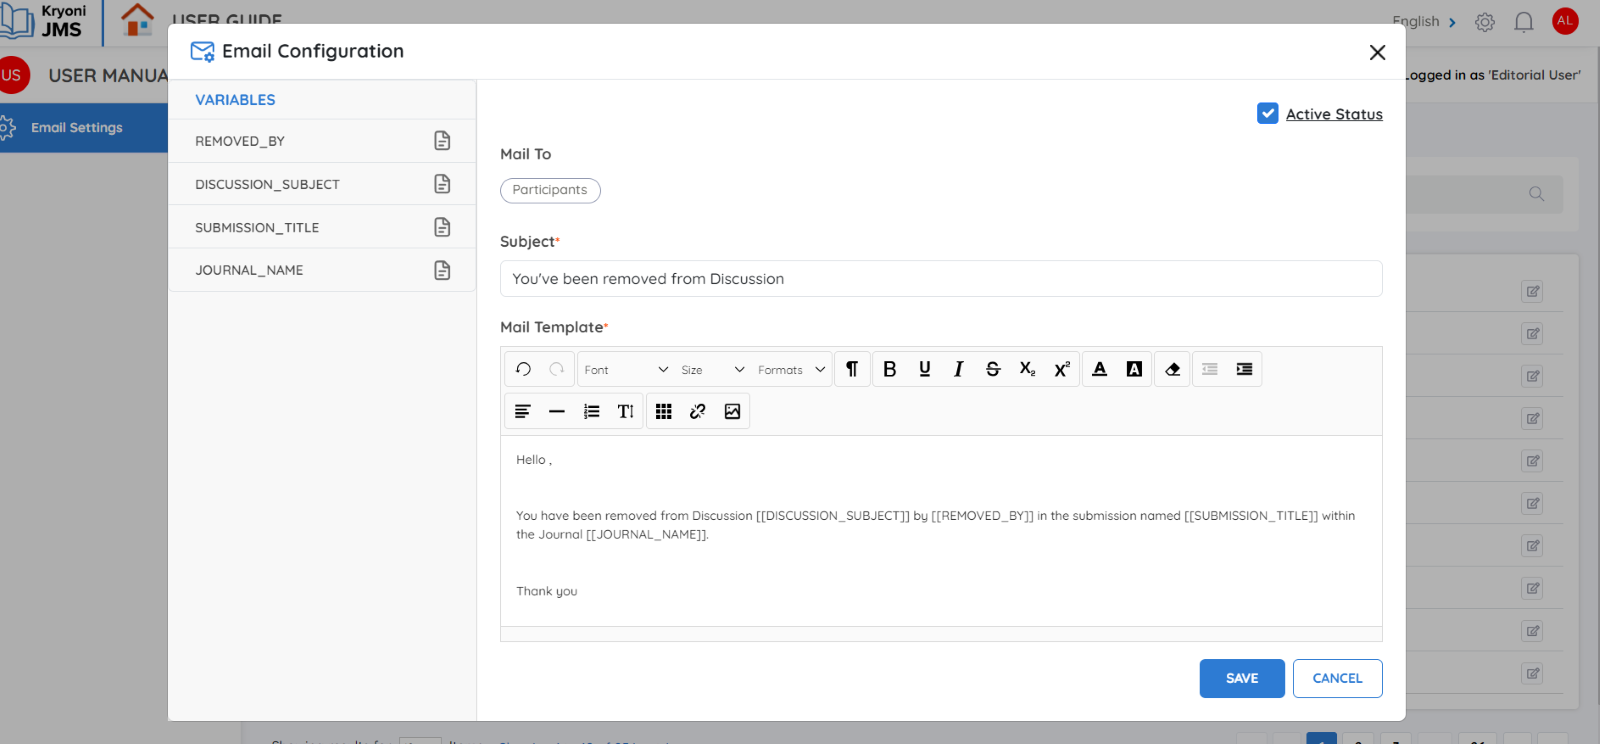
Email Configuration
Configuring the email settings is straightforward. You can utilize the list of available variables, conveniently displayed in the sidebar, to customize the content dynamically. These variables ensure that personalized details (such as usernames or journal names) are automatically inserted into the emails.
Activating or Deactivating Emails
You can easily enable or disable any email by checking the Active Status checkbox. When active, the email will be automatically triggered for the corresponding actions in the system.
By managing these settings, you ensure consistent and efficient communication across all journal activities.
Reports
The Reports section of the Journal Management System (JMS) allows you to efficiently download comprehensive reports related to submissions, reviews, and production processes.
